Been clearing out this section & have run across at least 100 threads dealing with these issues. So I'll try and put all known info in this one. The below image is a combination of several parts diagrams which show all that is needed in one. This basic diagram pertains to both the DL650 & DL1000, except the clutch portion.
DL650 procedural differences & part numbers list is at the end of 1000 items. Clutch slave rebuild at the end.The clutch push-rod seal, the drive shaft seal & the sprocket spacer o-ring all have engine oil on the other side. The slave cylinder piston cup (seal) contains the brake fluid for the hydraulic clutch system on the 1000.
All of these seals can be replaced from the outside of the engine. The oil seal retainer must be removed to replace either oil seal. The spacer o-ring can be replaced with just a sprocket removal.
 Removal, replacement & reassembly of whatever's in there:DL1000-Removing the clutch slave cylinder:
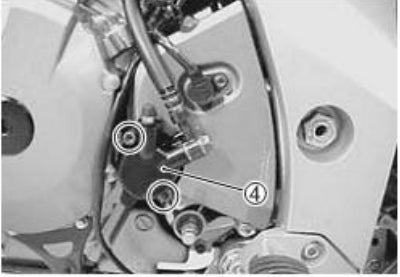
1. Pull the sidestand switch wiring harness from between the case & cylinder and push aside.
2. Either tie the clutch lever to the handlebar grip or once the cylinder is removed, wrap a wire-tie around the piston so it doesn't pop out.
3. Loosen the two bolts (double circle in above image) that hold the cylinder in place. Alternate a few turns on one and then the other until loose. Pay attention to the length of the bolts & which goes where.
4. The cylinder should pull straight out with a little wiggling. If it doesn't, tap lightly on both sides using a plastic or brass hammer. Don't loose the dowel pin which may fall out. There is a spacer behind the upper bolt which will fall out when the sprocket cover is removed.
5. Set the cylinder aside on top of the engine case. Don't forget the wire-tie if used.
DL1000-Removing the sprocket cover: Note: If you remove the foot-peg with bracket & the gear shifter you will have better access. I havn't found it necessary though.
1. Remove the clutch push-rod (1) if it didn't come out with the cylinder.
2. Remove the speed sensor pick-up and set aside. Black thingie in the center of cover with wires.
3. Remove the 3 bolts (double circle in above image) holding the cover. The upper bolt will have a cable holder attached. Upper bolt is short & 2 lower bolts long.
4. The cover is now free is come off. Will take a little wiggling around to get out.
DL1000-Removing the primary sprocket: Note: Do not remove wheel or chain until primary sprocket is off.
1. Remove the speed sensor rotor (3), bolt will be fairly snug. Press and hold rear brake while breaking the bolt loose.
2. Remove the sprocket retaining nut & washer. This nut can be a real bugger to remove, as it should be torqued well with red thread locker applied. You will need a 32mm (or 1 1/4") socket, short extension (3") & a 1/2" or 3/4" breaker bar. What I've found that works for most folks is to place the socket on the nut with the breaker bar pointing toward the front, straddle the bike, grasp the handlebars, apply the rear brake with right foot firmly & then using left foot press down on the breaker bar with all your weight. Don't fall off when it lets go. Other options are to use a 2x2 across the swingarm & through the wheel. Watch out you don't crush something. Or an impact wrench with the transmission in neutral. If all else fails, apply some heat to the nut to break-down the thread locker.
3. Remove the sprocket. If there is sufficant slack in the chain you should be able to side the sprocket off the shaft. If not, move the rear wheel forward & remove the chain from the rear spocket.
4. If doing a seal & o-ring replacement, remove the sprocket spacer. This should just side off of the shaft. If you have to use pliers, rap something around the spacer so it is not scratched.
5. Clean as much of the old red thread locker out of the retaining nut as possible.
DL1000-Removing the oil seal retainer:This is what the retainer looks like minus the drive shaft & a few other things. Don't worry about oil leaks when removed, the tab doesn't go into the engine, as you can see in the following image.

1. Remove clutch slave cylinder as above.
2. Remove sprocket cover as above.
3. Remove primary sprocket (leave sprocket spacer in place).
4. Clean the clutch push-rod.
5. Insert push-rod in seal.
6. Clean the area squeaky clean. (use gunk, kerosene, WD-40, whatever, cleaning brush, spoon, etc.)
7. Remove push-rod.
8. Remove 2 allen head retaining screws holding retainer.
9. The red tip (in image) of the retainer is held captive between the generator cover & the crankcase. Pull it out from the engine a little and wiggle while applying force to the rear of the bike. It should come loose without too much trouble.
10. Insert push-rod in seal & clean up the area uncovered when retainer is removed.
DL1000-Removing the push-rod seal:
1. You can lean the Strom over to the right about 15 degrees or drain some of the engine oil. Probably better to drain the oil.
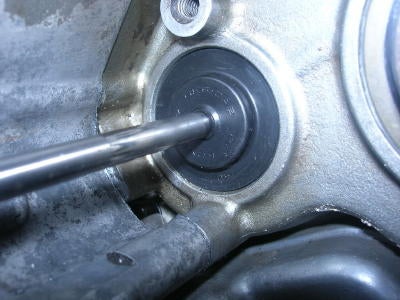
2. Using a flat-tip screwdriver at the edge of the seal and pulling toward you should pop it right out. If it's stubborn, use a large sheet-metal screw (say 20% larger than the push-rod), screw it into the push-rod hole, then using slight sidewards pressure pull the seal out toward you.
DL1000-Installing a new the push-rod seal:1. Clean the seal mounting hole squeaky clean with alcohol.
2. Clean the sealing surface & the push-rod hole of the new seal with alcohol. A good grade of Q-tips work well for the hole.
3. Put a light coat of silicone grease on the mounting surface of the new seal.
4. Insert the new seal. Use a socket slightly smaller than the seal diameter and using a brass hammer, lightly tap the seal into the hole so it is seated well.
 DL1000-Removing the drive shaft seal:
1. Remove the sprocket spacer. This should just slide off of the shaft. If you have to use pliers, wrap something around the spacer so it is not scratched.
2. If you have a seal removal tool you already know how to remove the seal.
3. If not, I've found that a good strong L-tipped scribe can work well.
4. Grab the scribe with a pair of pliers & insert the sharp point of the L-tip through the seal form the inside of the seal to outside (side nearest shaft to side nearest case). Be very careful not to scratch the shaft or the case, then pull the seal out.
4a. If you don't have good scribe, use a small screwdriver, lightly tap it through the seal, observing above precautions, and pry the seal out.
4b. The oil seal can also be removed by drilling a small pilot hole and inserting a sheet metal screw to fit & some pliers to pull it out.
DL1000-Installing a new drive shaft seal:1. Clean the case where the seal fits & the drive-shaft (try to get most of the red thread locker off) with alcohol.
2. Clean the outer shell & inner lip of the new seal with alcohol.
3. Apply a light coat of silicone grease around the outer shell & inner lip of the new seal.
4. If you have a seal insertion tool you already know how to install.
5. If not, press the seal into the hole until the outside of the seal is aligned with the outside of the case keeping it even all around.
DO NOT insert the seal all the way into the hole.
6. If you have a deep well socket that is deep enough to miss the drive shaft and that is slightly smaller than the diameter of the seal, use it to drive the seal home (even with the case) using light taps with a brass hammer.
7. If no socket, use the old seal backward to protect the new seal. Use some tool or object (dowel rod, etc.) that is flat on the end and about a 1/4" in width. Lightly tap the old seal which is covering the new seal around the edge until the new seal is properly seated even with the case.
Note: Replace the seal & o-ring as a pair. Too many times I've seen a seal replaced repeatedly when the o-ring was the problem.DL1000-Removing & installing the new spacer o-ring:1. The o-ring is inside of the sprocket spacer.
2. Remove the o-ring with same scribe or other tool being careful not to scratch the o-ring groove.
3. Clean the interior & exterior of the spacer with alcohol paying special attention to the o-ring groove.
4. Apply a liberal coating of silicone grease to the entire o-ring.
5. Insert the new o-ring into the spacer groove.
6. Install the spacer over the drive-shaft & through the new oil seal. The grooved side of the spacer faces the crankcase side (away from you). Be careful to not damage the new o-ring on what may be sharp drive shaft splines.
DL1000-Installing the seal retainer:1. Apply a small amount of silicone gasket maker to the tip of the retainer to be inserted into the hole between the cover & case.
2. Insert the tip between the cover & case & tap in lightly until the mounting holes line up.
3. Install the 2 allen head retaining screws using a drop of blue thread locker.
 DL1000-Installing primary sprocket:
1. Ensure the sprocket spacer has been installed as above.
2. Slip the chain around the sprocket and position sprocket on drive-shaft splines.
3. Install the washer.
4. If you didn't clean the old thread locker out of the nut, do it now. Apply about 3 drops of red thread locker along the threaded part of the drive shaft. Install the nut.
5. Use reverse methods from the sprocket removal section and torque the nut to 83 lb ft (115 Nm).
6. Install the speed sensor rotor & torque to 16.5 lb ft (23Nm).
DL1000-Installing the sprocket cover:Before installing the sprocket cover, lets ensure the clutch push-rod seal is clean. You need to do this even if the seal has been replaced and is very important to accomplish if you havn't replaced the seal. Use a Q-tip and some alcohol and clean the the push-rod seal hole to a depth of about 1/2". Apply a small amount of silicone grease around the inside of the hole also using a Q-tip.
1. Wiggle the cover back into position.
2. Install the 3 bolts. The short bolt goes on top & don't forget the cable holder.
3. Snug the bolts down alternating between the 3. Don't get these too tight, it's just plastic.
4. Install the speed sensor & snug up the bolt.
DL1000-Installing the clutch slave cylinder:If you havn't done anything to the slave, let's get it cleaned up. Taking a few minutes to clean & lube properly will greater increase your percentage of not having a slave or seal failure. The clutch will also work smoother & easier.
If you have an 03.5 and up model, pull off the dirt seal (27A in the first diagram) & get it cleaned up. Making sure the push-rod hole is squeaky clean. Release the clutch lever if you have it tied to the grip. Push the piston back in the bore using your fingers or thumbs as far as it will go. The spring will try and push it back out, so hold it in while cleaning. Use some brake cleaner to blow out any gunk that might be around the outside of the piston or in the bore. After it's clean & dry, apply a light coat of brake fluid around the bore next to the piston & let the piston go. It should return some and then stop. Apply some silicone grease into the push-rod recess in the piston. Reinsert the dirt seal.
1. Make sure the push-rod is clean and them apply a light coat of silicone grease to the tip that goes into the engine up to about 1" from the end. Then do the same thing to the other end but use the silicone grease.
2. Insert the push-rod though the cover and into the seal & engine until it stops. Move it around slightly to ensure it's seated in the inner push-rod.
3. Make sure the sidestand switch cable is out of the way.
4. Ensure the positioning dowel is either in the case or the slave.
5. Put the longer bolt through the upper hole in the slave & then the spacer over the bolt (engine side).
6. Insert the push-rod into the slave while positioning the slave on the dowel pin. You have to guide the top bolt a little. Once your sure the slave in down square on the dowel, insert the lower bolt and get them started in the engine case threads. At this point you should be able to wiggle the slave around just a little.
7. Tighten both bolts until they just start to get to the point where more force is required.
8. Take a look to see if all is square & seated.
9. Tighten each bolt in a alternating pattern about 2 turns at a time until they are both seated and the slave has been drawn down solid.
10. Torque both bolts to 8 lb ft (11 Nm).
11. Try the clutch lever to make sure it operates properly.
12. Take the slack out of the side-stand cable below the slave and push it into the crack between the generator cover & slave.
13. Place all 3 cables (alternator, side-stand & speed sensor) into the sprocket cover top bolt cable holder.

 DL650 Differences:650 part numbers:
Clutch push-rod seal: 09285-06015
Drive shaft oil seal: 09283-36003
Sprocket spacer o-ring: 09280-24010
DL650-Removing the sprocket cover & clutch release assembly:
1. Remove the 3 bolts (circled in above image) holding the cover.
2. The cover is now free is come off. Will take a little wiggling around to get out.

3. Remove the 2 bolts holding the release assembly (3).
4. Remove the release assembly (3), it's support plate (4) and spring (5).
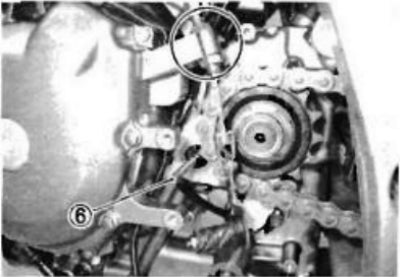
5. Remove the clutch push-rod (6).
6. Remove the clutch cable from the generator cover (circled).
DL650-Removing the Primary Sprocket:
1. Flatten the lock washer (arrow). The best way to do this is brute force using a drift punch & hammer. Don't smack it any harder than necessary & it doesn't have to be completely flat.
2. Remove the primary sprocket. Refer to the above section "DL1000-Removing the primary sprocket".
DL650-Removing the oil seal retainer:1. Same procedure as above in the 'DL1000-Removing the oil seal retainer' section.
DL650-Removing the push-rod seal:1. Same procedure as above in the 'DL1000-Removing the push-rod seal' section.
DL650-Installing a new the push-rod seal:1. Same procedure as above in the 'DL1000-Installing the push-rod seal' section.
DL650-Removing the drive shaft seal:1. Same procedure as above in the 'DL1000-Removing the drive shaft seal' section.
DL650-Installing a new drive shaft seal:1. Same procedure as above in the 'DL1000-Installing the new drive shaft seal' section.
Note: Replace the seal & o-ring as a pair. Too many times I've seen a seal replaced repeatedly when the o-ring was the problem.DL650-Removing & installing the new spacer o-ring:1. Same procedure as above in the 'DL1000-Removing & installing the new spacer o-ring' section.
DL650-Installing the seal retainer:1. Same procedure as above in the 'DL1000-Installing the seal retainer' section.
DL650-Installing primary sprocket:1. Same procedure as above in the 'DL1000-Installing primary sprocket' section. Except torque spec is 105 lb ft (145 Nm).
DL650-Installing the clutch release assembly & sprocket cover:1. Make sure the push-rod is clean and them apply a light coat of silicone grease to the tip that goes into the engine up to about 1" from the end. Then do the same thing to the other end but use the silicone grease.
2. Insert the push-rod though the seal into the engine until it stops. Move it around slightly to ensure it's seated in the inner push-rod.

3. Clean all the old grease & gunk off both the outer release & worm shaft & lever.
4. Install the clutch worm lever over the push-rod and position abort 80 degrees as shown in above image.
5. Install the clutch cable in the generator cover temporarily.

6. Apply Suzuki Moly Paste to both sides of the clutch release, worm & receptor. As a substitute you can use Dormans CV Joint Grease -
Clicky. I've also had good luck with Belray Waterproof Grease.

7. Assemble the clutch release so that the lever arm (A) will be at an angle of 80 degrees with axis (B).
8. Install the two release assembly retaining bolts & return spring.

9. Adjust the cable play. Loosen the lock not (3) and turn out the screw (4) a few turns. From that position, slowly turn the adjuster screw (4) in until it stops turning easily. Turn the adjuster screw (4) out 1/4 turn and tighten the lock nut (3) while holding the screw (4) at this position.
10. Loosen the lock nuts (5), if you have tightened them, and turn the cable adjuster (6) to obtain 10-15mm (0.4-0.6") at the clutch lever end.
11. Tighten lock nuts (5).

12. Wiggle the cover back into position.
13. Install the 3 bolts & snug them down alternating between the 3. Don't get these too tight, it's just plastic.
Clutch Slave Cylinder Rebuild:If on the road, or not, a careful rebuild can probably save your slave cylinder about 80% of the time. The only item your need to carry in your spares pack is the piston cup (seal), #24 in following diagram. Part number 23163-06B00, about 5 bucks on line. Other items needed that should be obtainable locally are; 600-1000 grit wet & dry sandpaper, DOT4 brake fluid & cleaning fluid (spray brake cleaner works well).
Borrowed some of ib's recent pics.

These are the parts inside the slave cylinder & the cylinder. From left to right, cylinder, spring, & piston with seal mounted. The only other part besides the bleed valve, banjo bolt & dowl pin is the dirt seal, which is not shown, but it's part #27A in the above diagram.
When dealing when hydraulic systems, the old phrase, 'cleanliness is next to godliness', is right on.

This next image shows want the bore & piston looked like after cleaning and before burnishing.

This is the bore after burnishing with 1000 grit wet & dry sandpaper, wet.
 Rebuilding:
1. Remove the cylinder from motor as described above. If the dowel positioning pin (28) is attached don't lose it.
2. Pill out the dirt seal (27A).
3. If you have access to compressed air: Remove the banjo bolt connecting the clutch line while holding the cylinder over a pan or something to collect the fluid. Hold a rag over the piston bore and inject compressed air into the banjo bolt hole. It doesn't take much air and the piston will pop right out.
If you don't have compressed air: Do not disconnect the clutch line. Hold the cylinder over a pan, cover piston with a rag and squeeze the clutch lever. After piston & spring are out you can disconnect the clutch line.
4. Remove the bleed valve.
5. Remove the seal from the piston. Pay attention to which way it's on. If you have to reuse this be very careful.
6. Now clean everything up using brake cleaner very well. This includes the bore housing and passages, piston, spring, banjo bolt, bleed valve, dirt seal & piston seal if you have to reuse.
7. Examine the piston bore, if there are no deep scratches it's probably salvageable. We'll discuss emergency deep scratch repair later.
8. Fill a bowl with clean water and wet down a few small one inch strips of the wet & dry sandpaper. The bore needs to be as round as possible. So when burnishing the bore don't spend to much time concentrating on one spot.
9. Using the sandpaper strip rapped around your finger, lightly polish the bore all the way around until it looks fairly clean. From time-to-time, dip the cylinder & sandpaper into the bowl of water to keep them clean & wet. Unless the wear is really bad, you shouldn't have to take too much off to clean it up fairly well. The more you take off, or the more out of round it becomes, the less chance you'll have of savaging it. But you do want it as smooth as possible. Have to use a little common sense here.
10. If the piston has light scratches or is scuffed, wet polish it as well.
11. Clean & dry everything very well and keep them clean while assembling. Make sure there is absolutely no water remaining.
12. Install the bleed valve into the cylinder.
13. Coat the seal groove on the piston and around the piston sides with fresh brake fluid. Coat the entire seal with fresh brake fluid. Install the new (or old if reusing) seal on the piston just like the old one was. You did pay attention when you took it off, didn't you? Narrow side toward the outside.

14. Coat the cylinder bore with fresh brake fluid.
15. Insert the spring into the piston & slide the piston into the bore. If the seal is being stubborn, use a non-sharp tool to squeeze it in all around.
16. Apply a dab of silicone grease to the push-rod recess in the piston & into the push-rod hole in the dirt seal.

17. Insert the dirt seal into the cylinder & keep your fingers crossed.

18. Install the slave, hook-up the clutch line (banjo bolt torque is 16.5 lb ft (23 Nm) & bleed the system.
Emergency deep scratch repair:You do have JB Weld as part of your kit, right? If not, you can probably get by with liquid aluminum or a good 2-part epoxy.
1. Do the normal burnishing as described above. Clean & dry cylinder well.
2. You will need a piece of the old piston seal or something pliable with approximately the same curvature as the cylinder bore. Ensure it's clean of contaminates.
3. Mix up a small amount of your patching potion.
4. Apply a very small amount into the scratch to be repaired and allow to set for a few minutes.
5. Use your pliable tool and scrap any excess potion from the cylinder. A back-to-front motion works best & don't press down very hard. If you remove too much, clean it all off and try again, but let it set a longer period this time.
6. Allow for the full curing time.
7. Burnish to a smooth finish using the sandpaper as above.
Additional info for this thread:If using tacky chain lube your sprocket area may look like this.

If using Dupont Teflon Multi Lube or Belray Super Clean it can look like this.


 Your Privacy Choices