V-Strom Riders International
04/16/24 1011 Hours


Welcome, Guest. Please login or register.
Did you miss your activation email?
Login with username, password and session length
News: For login problems please contact admin - motorcycle@vssupportqueue.com
Advanced search  
  Pages: 1 |   Go to Bottom of page
EMAIL THIS TOPIC | PRINT
Author Topic: DL650K4 Clutch Plate Replacement  (Read 29974 times)
0 Members and 1 Guest are viewing this topic.
Sandiegoland
****
03/14/05 2331 Hours
Posts: 947

San Diego, CA
www Offline
« on: 12/27/07 2029 Hours »
| All unread Move to top Move to bottom  

Report: DL650K4 Clutch Plate Replacement

Summary:
If you service your motorcycle and are familiar with using the Service Manual this is an easy process. Give yourself adequate time, as the covers and hoses you need to remove may have not been dislodged for a long period of time.

Read over my report to get familiar with the process. You should then do the actual procedure using the Service Manual.

OEM Parts:


(1 ea) 11482-17G00 GASKET, CLUTCH COVER

(6 ea) 21413-17G01 SPRING, CLUTCH

(1 ea) 21442-29F00 PLATE, CLUTCH DRIVE NO.2

(6 ea) 21441-29F20 PLATE, CLUTCH DRIVE NO.1

(1 ea) 09263-15003 RC 15X28X2 BRG

Overkill:

(6 ea) 21451-28C31 PLATE, CLUTCH DR

(1 ea) 09160-15045 THRUST WASHER

Extremely Prepared (but cheap, so why not?):

(2 ea) 09280-22001 OIL PLUG O RING

(1 ea) 17418-19F00 WATER PUMP O RING

Other Materials:

Engine Oil

Radiator Fluid

Tools:

Suzuki DL650 Service Manual

Suzuki DL650 Tool Kit (Hex Keys, misc.)

Vernier Calipers

Socket Wrench, 8mm Deep Socket, 10mm Socket, misc.

Razor Blade

Catch Basins and Hazardous Waste Containers (Oil, Radiator Fluid)

Process:

0. Unpackage the Clutch Drive Plates and soak them in the same oil you plan to use in the motor. A pie-tin is tall enough for this. The Service Manual simply recommends applying oil to the plates before inserting them, but it certainly can't hurt to let them sit in the same stuff they're going to sit the next number of years in!


Since this requires you to drain both oil and radiator fluid, consider combining this procedure with a 15K interval service to include (but not limited to) changing spark plugs and checking valve clearances.

1. Drain the engine oil (from the "warmed-up" engine).


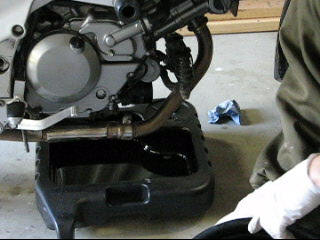
If you haven't already discovered the advantages to a deep oil catch basin, give it a try. On high clearance motorcycles it will save on a lot of clean-ups from splashing hot oil about.

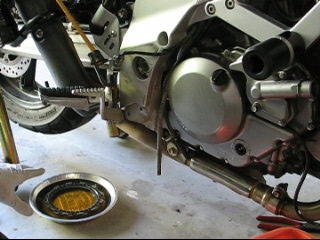
2. If checking the valves, let the bike cool for at least 4 hours. Remove the side cowling and plastic that you normally do to access the radiator.

Optional: Remove the additional cowling and plastic to facilitate easier removal of the fuel tank, pivoting of the radiator, and access to checking valve clearances.

3. Drain the radiator fluid.


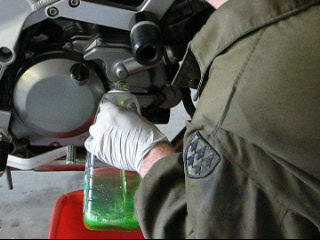
Do not remove the radiator cap. It is possible to catch at least 95% of the radiator fluid by loosening the water drain plug, positioning a catch container beneath the opening, and then slowly opening the radiator cap. Adjust the position of the catch container as the flow increases and declines to a trickle. Catch the remaining fluid with a catch basin (or old dish bin).

4. Remove the water hoses (2) from the Water Pump Assembly mounted to the Clutch Cover.


After releasing the hose clamps, these hoses may need a gentle "twist" from a non-serrated pair of pliers to "crack" their grip and make it easier to pull them off. They should not require harsh tugging that might stretch or damage them during removal. Replace the water drain plug once no more fluid is draining out of the Water Pump Assembly.

Optional: Now is a good time to remove the fuel tank, check the air filter, remove the spark plugs, pivot the radiator and check the valve clearances. Replace the spark plugs and restore the radiator mounting and fuel tank. Do not reconnect the radiator hoses to the Water Pump Assembly.

...continued...

Logged


Sandiegoland
****
03/14/05 2331 Hours
Posts: 947

San Diego, CA
www Offline
« REPLY #1 on: 12/27/07 2030 Hours »
| All unread Move to top Move to bottom  

5. Remove the hex-head bolts holding the right foot-peg / rear-brake lever assembly from the frame.


Use a bungee cord or line to tie the foot-peg assembly out of the way of the Clutch Cover.


6. Note the routing of the hoses that are running along the rear of the Clutch Cover (that lie over the Clutch Cover mounting bolts). Move the hoses out of the way.

7. Note the routing and tie-off of the hose running out of the bottom of the Water Pump Assembly. Remove the hose from the tie-off clamp.

8. Remove 14 bolts holding the Clutch Cover on the Engine Crankcase. Note that three bolts associated with the Water Pump Assembly are longer, and don't forget that one bolt is not along the Clutch Cover case perimeter.

9. Do not grab or pull on the Water Pump Assembly to loosen or dislodge the Clutch Cover from the Engine Crankcase. If at all possible, keep the seal between the Water Pump Assembly and the Clutch Cover intact. On older motorcycles it may be advisable at this time to further inspect or replace the Water Pump Assembly or the seals/o-rings between the Water Pump Assembly and the Clutch Cover. In many cases the seals will be in good condition even if the Water Pump Assembly moves or rotates, and it should reseal without problem.

Tap the Clutch Cover with a soft mallet (rubber or hard plastic) to see if it will loosen from the Engine Crankcase. The cover is installed with dowels, and in addition the seal may be adhered to both the Clutch Cover and the Engine Crankcase. If necessary to free the Clutch Cover, gently pry the Clutch Cover with the tab located behind the water pump. Do not pry or pull on the water pump. This will only dislodge the water pump and potentially damage the water pump gear or the impeller/shaft, etc.


Gently grasp the Clutch Cover and pull the cover out as straight as possible. It may take a little rocking or rotation to free the teeth of the water pump gear, or to coax a stubborn gasket. Take care to account for the two Dowel Pins and remove them if necessary to eradicate the existing gasket.


...continued...
Logged

Sandiegoland
****
03/14/05 2331 Hours
Posts: 947

San Diego, CA
www Offline
« REPLY #2 on: 12/27/07 2032 Hours »
| All unread Move to top Move to bottom  

10. Cover the remaining clutch components and gears inside the Engine Crankcase with a rag or shop towel to prevent gasket debris from falling in. Remove all traces of the existing gasket and clean the mating surfaces of the Engine Crankcase and the Clutch Cover. If using a razor blade, use heavy gloves and do not score any surfaces. Scrape slowly with a shallow angle.


If any gasket debris falls on the towel, just pull the towel away, dumping the debris free of the Engine Crankcase.

11. Evenly loosen the bolts holding the Clutch Pressure Disk/Plate. Remove the bolts and the Clutch Springs.


Measure the Clutch Springs. Springs not within the service limit of 50.5 mm (1.99 in) should be replaced (page 3-69 of the Service Manual). For reference mine measured between 48.06 mm and 48.65 mm and were all replaced.


Remove the Clutch Pressure Disk/Plate. Several Clutch Drive Plates and Clutch Driven Plates may come out with the Clutch Pressure Disk/Plate. The Thrust Washer that mounts over the Clutch Bearing may come out with the Clutch Pressure Disk/Plate (take care to recover the Thrust Washer, even if you have a replacement. Avoid any "unaccounted for" loose parts. They may end up forgotten inside the Engine Crankcase!!).


...continued...
Logged

Advertisement


Sandiegoland
****
03/14/05 2331 Hours
Posts: 947

San Diego, CA
www Offline
« REPLY #3 on: 12/27/07 2042 Hours »
| All unread Move to top Move to bottom  

12. Remove the Thrust Washer and Clutch Bearing. Remove the 6 Clutch Drive Plates and 6 Clutch Driven Plates (the metal ones) from the Clutch Sleeve Hub and place them in the order and orientation in which they were installed (combining them in order with any plates that came out with the Clutch Pressure Plate). Remove the final Clutch Drive Plate (PN 21442-29F00). Leave the two large washers (items 8 & 9 on the parts fiche clutch assembly drawing. If they fall out reposition them according to the illustration on page 3-91 of the Service Manual).


Note that the Spring Washer (item 9 in the parts fiche clutch assembly drawing) scored a ring in the last Clutch Driven Plate (the last metal plate). This should not be of great concern or reason alone to replace the Clutch Driven Plates. For reference, I had pre-purchased the Clutch Driven Plates and replaced them all despite their acceptable condition.


Check for glazing on the surface of the Clutch Drive Plates. Measure the thickness of the Clutch Drive Plates and the width of the claws. If the thickness is less than 2.92 mm (0.115 in) or the claw width is less than 11.5 mm (0.453 in) then the plates should be replaced (page 3-69 of the Service Manual). In addition, glazing will also compromise the operation of the clutch and should be a consideration in replacement of the clutch plates. For reference mine had a thickness of  2.93 mm (final plate was 2.97 mm), and the claw width was 13.82 mm (final plate was 13.90 mm). All disks were black and showed minor glazing.


13. Insert the unique Clutch Drive Plate ("NO.2") into the Clutch Sleeve Hub (reference page 3-91 in the Service Manual for measurements to identify this plate). Next, starting with a "metal" Clutch Driven Plate, insert alternating Clutch Driven Plates and Clutch Drive Plates into the Clutch Sleeve Hub until you have inserted the remaining 12 plates (reference page 3-91 of the Service Manual).


...continued...
Logged

Sandiegoland
****
03/14/05 2331 Hours
Posts: 947

San Diego, CA
www Offline
« REPLY #4 on: 12/27/07 2043 Hours »
| All unread Move to top Move to bottom  

14. Place the Clutch Bearing over the clutch push piece, and then place the Thrust Washer over the bearing.


For reference, I replaced this bearing though it showed no significant signs of wear. It was just too cheap to "cheap out" on.

15. Slide the Clutch Pressure Disk/Plate back into position.


Insert the Clutch Springs and bolts, tightening them uniformly so that the plates stay evenly seated.


Torque them in accordance to the instructions on page 3-92 of the Service Manual.


16. Position the new gasket and insert the Dowel Pins (if removed when removing the old gasket). Position the Clutch Cover into place and install the cover bolts, noting that the long bolts are associated with the Water Pump Assembly.

17. Tie-down the hose running out of the bottom of the Water Pump Assembly.

18. Re-route and/or tie-down the hoses that run along the rear of the Clutch Cover.


19. Re-mount the right foot-peg / rear-brake lever assembly to the frame.

20. Re-connect the water hoses and clamps to the Water Pump Assembly.

21. Check that you have an oil filter installed. Add engine oil. Don't forget you can use the new oil you soaked the new clean clutch plates in.

22. Add radiator fluid (note that several engine cycles may be required before radiator level is accurate).

23. Check all connections and fittings touched in this service. Check for any leaks. Check work area for any unaccounted parts. Start the motor.

Optional: Warm up the engine and perform a TBS.

24. Ensure the rear brake lever is activating the rear brake light, and that the brake light is not constantly illuminated (adjust brake lever sensor as necessary).

25. Adjust the clutch (page 2-17 of the Service Manual). Test drive the motorcycle. After several engine cycles with accurate fluid levels (oil and radiator), proceed to reinstalling the cowlings and other plastic that were removed for easier access.

Conclusion.

Logged

Sandiegoland
****
03/14/05 2331 Hours
Posts: 947

San Diego, CA
www Offline
« REPLY #5 on: 12/27/07 2044 Hours »
| All unread Move to top Move to bottom  

Comments/Edits welcome... Let's get this cleaned up!  Grin
Logged

Compared To What
*****
06/09/04 2346 Hours
Posts: 1204

6Fiddy
Carlsbad, (Not NM)
Offline
« REPLY #6 on: 12/27/07 2110 Hours »
| All unread Move to top Move to bottom  

Quote:

Sandiegoland wrote on 27.12.2007 12:44[/i]
Comments
#####/Edits welcome... Let's get this cleaned up!
 Grin


Nice job Craig. . . . This should be a big help for those Strommers that have never done a clutch job.

Logged

Experience is a hard teacher because the test is first, the lesson afterward.
johnofchar
Deceased VSRI Administrator
Former Member
******
10/19/03 1511 Hours
Posts: 11989

SV-Strom & K9 ABS Wee
Charleston SC USA
Offline
« REPLY #7 on: 12/27/07 2144 Hours »
| All unread Move to top Move to bottom  

Outstanding Craig, we need a lot more of these good maintenance write-ups for our new section of which you are now a plank owner.   Happy  Grin
Logged

“Most of the stuff people worry about, ain't never gonna happen anyway.” 

  Get your flags
DRxDR
***
11/15/04 0456 Hours
Posts: 311
DL650
California
Offline
« REPLY #8 on: 12/29/07 0333 Hours »
| All unread Move to top Move to bottom  

Well done Craig.  Hope I don't have to do this for awhile but when I do you can bet this will be the first place I'll look for parts and install info.  Thanks for the well documented description.   Happy   wayne
Logged
SpeedStar
****
01/31/05 1511 Hours
Posts: 730

DL650 06, KTM 950SM
San Diego, Ca
Offline
« REPLY #9 on: 12/29/07 1545 Hours »
| All unread Move to top Move to bottom  

Way to go Craig!  Great report and as always, good detailed photos too.
I know where I am going when the time comes for mine!
Logged

Check out my V-Strom guards in Stromers Merchandise.  Thanks, Devin 
 
FS: Frame guards, triple-clamp covers, fork guards and tank guards. http://www.vstrom.info/Smf/index.php/topic,748.0.html

FS:  Headlight masks.  http://www.vstrom.info/Smf/index.php/topic,4474.0.html
RubberDown
*****
10/15/04 2131 Hours
Posts: 1088

Maryland
Offline
« REPLY #10 on: 12/29/07 1640 Hours »
| All unread Move to top Move to bottom  

Great "how to" on the clutch replacement.   Happy

I had a Ducati 900 with vented clutch cover.  If you didn't ride the bike after washing, the clutch plates would rust together and you had to disassmble the whole thing to "unstick" them.  Eventually I learned to ride the bike after every wash........or else.  Grin
Logged
jnoflane2
**
04/17/08 0218 Hours
Posts: 54
Colorado, USA
Offline
« REPLY #11 on: 08/24/09 1246 Hours »
| All unread Move to top Move to bottom  

Very good write-up and pics!!!!!

My DL650 is relatively new, being a 2007, but I have burned through the stock clutch riding a lot of techincal routes, slipping the clutch a lot.


My replacement, Barnett Clutch, just arrived and I will be tackling the job later this week.  After looking at your pics, one thing I forgot was a new gasket for the case cover.

In my situation, I will be replacing all steel plates, cutch plates and intalling new springs.
Logged

Jamie Z
***
10/18/06 0748 Hours
Posts: 308

Memphis
Offline
« REPLY #12 on: 05/04/11 0225 Hours »
| All unread Move to top Move to bottom  

Great write up. Wish I didn't have to read it.  Embarrassed

Doubly so that I just changed the coolant today, and changed the oil a few days back. Took the bike out for a spin this evening and the clutch is slipping. Getting up to around 90,000 miles on the bike, so I guess it's about time...

Wondering if there is a way to save the coolant and oil and simply reuse it, since both are practically brand new.

Hope my local dealer will have this stuff in stock (he won't), otherwise I'm going to have to pay extra for super fast shipping, since I'm planning to leave to go out of town Friday or Saturday. Is there anything else it could be? As far as I know the clutch has never slipped before. Like I said I changed the oil a few days ago and have put maybe 100 miles on since then. Today I changed the coolant and when I rode it afterward, the clutch slipped when I revved it up, though I was able to ride it back home fine as long as I didn't get on the gas.

Jamie
Logged
Jamie Z
***
10/18/06 0748 Hours
Posts: 308

Memphis
Offline
« REPLY #13 on: 05/04/11 0637 Hours »
| All unread Move to top Move to bottom  

Seems I jumped the gun. Further inspection shows that the nut has come loose on the countershaft and the sprocket has come a bit loose. Hope I didn't chew up the splines. In any case, at least it's probably not the clutch.

Jamie
Logged
johnofchar
Deceased VSRI Administrator
Former Member
******
10/19/03 1511 Hours
Posts: 11989

SV-Strom & K9 ABS Wee
Charleston SC USA
Offline
« REPLY #14 on: 05/04/11 1111 Hours »
| All unread Move to top Move to bottom  

Seems I jumped the gun. Further inspection shows that the nut has come loose on the countershaft and the sprocket has come a bit loose. Hope I didn't chew up the splines. In any case, at least it's probably not the clutch.

Jamie
Lets hope so, better the clutch than the splines.
Logged

“Most of the stuff people worry about, ain't never gonna happen anyway.” 

  Get your flags
Jamie Z
***
10/18/06 0748 Hours
Posts: 308

Memphis
Offline
« REPLY #15 on: 06/05/11 1808 Hours »
| All unread Move to top Move to bottom  

Lets hope so, better the clutch than the splines.
I marked up the ends of the splines a little bit, and a small piece of one of the splines broke off, but by and large the shaft is fine. I pulled the sprocket off and replaced it with a different one I had on hand.

Jamie
Logged
nelmo
***
04/14/09 1922 Hours
Posts: 292

K6 DL650 GT
Reigate, Surrey, UK
Offline
« REPLY #16 on: 11/18/11 1216 Hours »
| All unread Move to top Move to bottom  

Anyone know how to get the photos for this thread (or is something wrong with my browser - not seeing them?)?

Also, I assume my K6 clutch will be the same as the K4?
Logged

"The secret of life is honesty and fair dealing. If you can fake that, you've got it made." - Groucho Marx
johnofchar
Deceased VSRI Administrator
Former Member
******
10/19/03 1511 Hours
Posts: 11989

SV-Strom & K9 ABS Wee
Charleston SC USA
Offline
« REPLY #17 on: 11/18/11 1345 Hours »
| All unread Move to top Move to bottom  

Anyone know how to get the photos for this thread (or is something wrong with my browser - not seeing them?)?

Also, I assume my K6 clutch will be the same as the K4?

Not sure why the pics got scrambled, but they are still in the gallery. Fixed the first post & will try to patch the rest later today.

Yes K4 & K6 are the same.
Logged

“Most of the stuff people worry about, ain't never gonna happen anyway.” 

  Get your flags
nelmo
***
04/14/09 1922 Hours
Posts: 292

K6 DL650 GT
Reigate, Surrey, UK
Offline
« REPLY #18 on: 11/18/11 1437 Hours »
| All unread Move to top Move to bottom  

Great - many thanks... Thumbs Up
Logged

"The secret of life is honesty and fair dealing. If you can fake that, you've got it made." - Groucho Marx
johnofchar
Deceased VSRI Administrator
Former Member
******
10/19/03 1511 Hours
Posts: 11989

SV-Strom & K9 ABS Wee
Charleston SC USA
Offline
« REPLY #19 on: 11/18/11 1709 Hours »
| All unread Move to top Move to bottom  

Images & links restored!   Hello
Logged

“Most of the stuff people worry about, ain't never gonna happen anyway.” 

  Get your flags
Sandoser
**
12/15/11 0144 Hours
Posts: 23

DL 650 L1
Santiago, Chile
Offline
« REPLY #20 on: 10/20/12 0008 Hours »
| All unread Move to top Move to bottom  

Thank to this post I changed clutch discs to a K5 this week
here is the link

http://www.facebook.com/vstrom.riderschile/photos_albums#!/media/set/?set=a.282467968537040.67201.100003215176894&type=3

GOOD JOB !!!!!!      SANDIEGOLAND Thumbs Up
Logged

http://www.facebook.com/#!/vstrom.riderschile/photos_albums
Ride_There
**
08/17/05 1715 Hours
Posts: 16
St. Paul, MN
Offline
« REPLY #21 on: 08/05/13 0239 Hours »
| All unread Move to top Move to bottom  

Thanks for all the info and pics!  I just started noticing slipping at 80,000 miles.  Figure it is best to replace everything than get stuck a state away.  Ordered parts today.  Still love the bike and want to get more mile out of it. 05 Dl650
Logged
Pages: 1 |  Go to Top of page
EMAIL THIS TOPIC | PRINT
Jump to:  

 B l a c k - R a i n V.2 by C r i p ~ Powered by SMF 1.1.18 | SMF © 2013, Simple Machines MySQL | PHP | XHTML | CSS   
Copyright V-Strom Riders International 2003-2013